
[Spring Boot & React] Polling 웹애플리케이션 만들기 - 1부
Spring Boot와 React를 연동하여 Polling 웹앱을 만들어보려고 한다.
CalliCoder에서 진행하는 Tutorial을 참고해서 다시 재구성해봤다. (링크)
최종적으로 만들어지는 페이지는 아래와 같다.
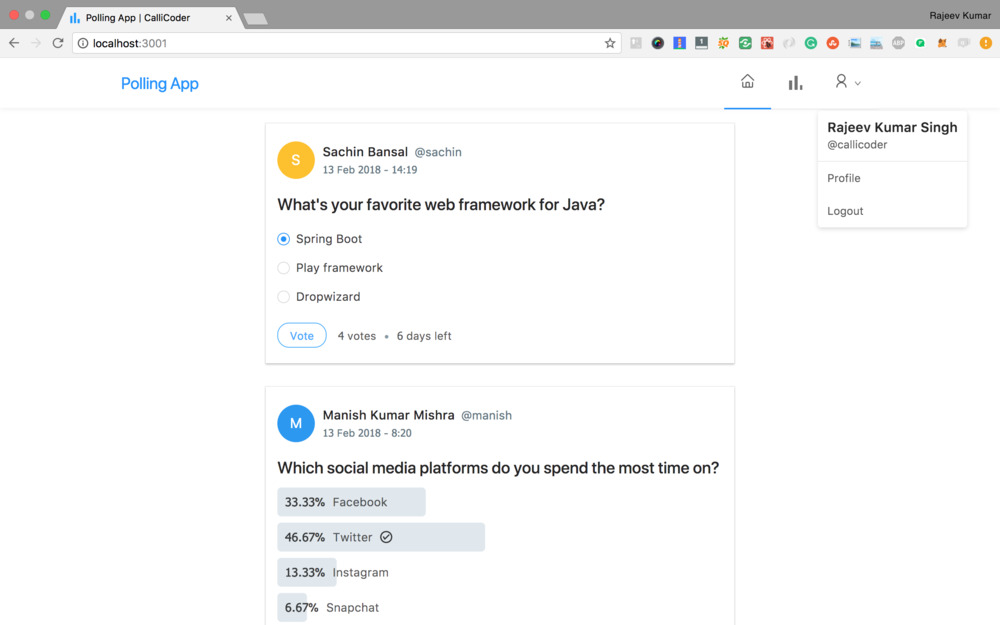
[구성]
Back-End
- Spring Boot (Spring Security와 JWT 인증을 활용한 백엔드 서버 구축)
- Database는 MySQL 활용 (JPA)
Front-End
- React
스프링 부트 프로젝트 생성하기
http://start.spring.io/에 접속해서 프로젝트를 생성해보자
자신의 프로젝트에 맞게 설정해주면 된다.
기본적으로 Dependencies는 Web, JPA, MySQL, Security를 추가했다.

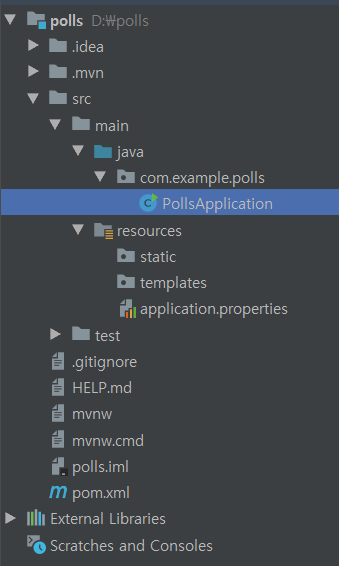
프로젝트를 다운받으면, 압축을 풀고 IDE로 프로젝트를 OPEN하자 (해당 포스팅에선 IntelliJ로 진행한다)
첫 프로젝트 구조는 아래와 같다
dependency 추가하기
프로젝트에 필요한 몇가지 dependency를 추가해야 한다.
`pom.xml`을 열어 dependencies 안에 추가시키자
|
1
2
3
4
5
6
7
8
9
10
11
12
|
<!-- For Working with Json Web Tokens (JWT) -->
<dependency>
<groupId>io.jsonwebtoken</groupId>
<artifactId>jjwt</artifactId>
<version>0.9.0</version>
</dependency>
<!-- For Java 8 Date/Time Support -->
<dependency>
<groupId>com.fasterxml.jackson.datatype</groupId>
<artifactId>jackson-datatype-jsr310</artifactId>
</dependency>
|
cs |
다음으로 `src/main/resources/application.properties`에 우리가 사용할 서버, 데이터베이스, 하이버네이트, 젝슨을 추가하자
|
1
2
3
4
5
6
7
8
9
10
11
12
13
14
15
16
17
18
19
20
21
22
23
|
## Server Properties
server.port= 5000
## Spring DATASOURCE (DataSourceAutoConfiguration & DataSourceProperties)
spring.datasource.url= jdbc:mysql://localhost:3306/polling_app?useSSL=false&serverTimezone=UTC&useLegacyDatetimeCode=false
spring.datasource.username= root
spring.datasource.password= '비밀번호'
## Hibernate Properties
# The SQL dialect makes Hibernate generate better SQL for the chosen database
spring.jpa.properties.hibernate.dialect = org.hibernate.dialect.MySQL5InnoDBDialect
spring.jpa.hibernate.ddl-auto = update
## Hibernate Logging
logging.level.org.hibernate.SQL= DEBUG
# Initialize the datasource with available DDL and DML scripts
spring.datasource.initialization-mode=always
## Jackson Properties
spring.jackson.serialization.WRITE_DATES_AS_TIMESTAMPS= false
spring.jackson.time-zone= UTC
|
cs |
JPA의 hibernate를 ddl-auto 설정을 update로 설정해놓았다. 이렇게 하면 엔티티에 따라 DB 테이블이 자동으로 업데이트 되어 적용이 가능하다.
Jackson의 `WRITE_DATES_AS_TIMESTAMPS` 속성은 Java 8 Date/Time 값을 timestamp로 직렬화하지 못하도록 하는데 사용된다.
다음으로는 MYSQL 워크벤치에서 polling_app 이름으로 데이터베이스 스키마를 만들자

Java 8 날짜 / UTC 시간대 사용하기 위한 부트 구성
도메인 모델에서 Java 8 Date/Time을 사용하기 위해 JPA 2.1을 등록해야 한다. 그러면 해당 필드가 DB에 유지될 때 자동으로 SQL 형식으로 변환이 가능하다.
메인 클래스 `PollsApplication.java`를 아래와 같이 수정하자
|
1
2
3
4
5
6
7
8
9
10
11
12
13
14
15
16
17
18
19
20
21
22
23
24
25
26
|
package com.example.polls;
import org.springframework.boot.SpringApplication;
import org.springframework.boot.autoconfigure.SpringBootApplication;
import org.springframework.boot.autoconfigure.domain.EntityScan;
import org.springframework.data.jpa.convert.threeten.Jsr310JpaConverters;
import javax.annotation.PostConstruct;
import java.util.TimeZone;
@SpringBootApplication
@EntityScan(basePackageClasses = {
PollsApplication.class,
Jsr310JpaConverters.class
})
public class PollsApplication {
@PostConstruct
void init() {
TimeZone.setDefault(TimeZone.getTimeZone("UTC"));
}
public static void main(String[] args) {
SpringApplication.run(PollsApplication.class, args);
}
}
|
cs |
도메인 모델 만들기
사용자가 회원가입을 하고, 로그인하도록 구현할 것이다. 또한 사용자의 권한에 대한 역할도 필요하다.
model 패키지를 만들어서 도메인 모델(User, Role)들을 관리하도록 하자
User 모델
- id : 기본키
- username : 유저 이름
- email : 이메일
- password : 암호화 형식으로 비밀번호 관리
- roles : Role 엔티티와 다대다 관계
`com/example/polls/model/User.java`
|
1
2
3
4
5
6
7
8
9
10
11
12
13
14
15
16
17
18
19
20
21
22
23
24
25
26
27
28
29
30
31
32
33
34
35
36
37
38
39
40
41
42
43
44
45
46
47
48
49
50
51
52
53
54
55
56
57
58
59
60
61
62
63
64
65
66
67
68
69
70
71
72
73
74
75
76
77
78
79
80
81
82
83
84
85
86
87
88
89
90
91
92
93
94
95
96
97
98
99
100
101
102
103
104
105
106
107
108
|
package com.example.polls.model;
import com.example.polls.model.audit.DateAudit;
import org.hibernate.annotations.NaturalId;
import javax.persistence.*;
import javax.validation.constraints.Email;
import javax.validation.constraints.NotBlank;
import javax.validation.constraints.Size;
import java.util.HashSet;
import java.util.Set;
@Entity
@Table(name = "users", uniqueConstraints = {
@UniqueConstraint(columnNames = {
"username"
}),
@UniqueConstraint(columnNames = {
"email"
})
})
public class User extends DateAudit {
@Id
@GeneratedValue(strategy = GenerationType.IDENTITY)
private Long id;
@NotBlank
@Size(max = 40)
private String name;
@NotBlank
@Size(max = 15)
private String username;
@NaturalId
@NotBlank
@Size(max = 40)
@Email
private String email;
@NotBlank
@Size(max = 100)
private String password;
@ManyToMany(fetch = FetchType.LAZY)
@JoinTable(name = "user_roles",
joinColumns = @JoinColumn(name = "user_id"),
inverseJoinColumns = @JoinColumn(name = "role_id"))
private Set<Role> roles = new HashSet<>();
public User() {
}
public User(String name, String username, String email, String password) {
this.name = name;
this.username = username;
this.email = email;
this.password = password;
}
public Long getId() {
return id;
}
public void setId(Long id) {
this.id = id;
}
public String getUsername() {
return username;
}
public void setUsername(String username) {
this.username = username;
}
public String getName() {
return name;
}
public void setName(String name) {
this.name = name;
}
public String getEmail() {
return email;
}
public void setEmail(String email) {
this.email = email;
}
public String getPassword() {
return password;
}
public void setPassword(String password) {
this.password = password;
}
public Set<Role> getRoles() {
return roles;
}
public void setRoles(Set<Role> roles) {
this.roles = roles;
}
}
|
cs |
DateAudit은 아래에 추가로 모델을 구현할 것이다.
Role 모델
- id
- name
`com/example/polls/model/Role.java`
|
1
2
3
4
5
6
7
8
9
10
11
12
13
14
15
16
17
18
19
20
21
22
23
24
25
26
27
28
29
30
31
32
33
34
35
36
37
38
39
40
41
|
package com.example.polls.model;
import org.hibernate.annotations.NaturalId;
import javax.persistence.*;
@Entity
@Table(name = "roles")
public class Role {
@Id
@GeneratedValue(strategy = GenerationType.IDENTITY)
private Long id;
@Enumerated(EnumType.STRING)
@NaturalId
@Column(length = 60)
private RoleName name;
public Role() {
}
public Role(RoleName name) {
this.name = name;
}
public Long getId() {
return id;
}
public void setId(Long id) {
this.id = id;
}
public RoleName getName() {
return name;
}
public void setName(RoleName name) {
this.name = name;
}
}
|
cs |
enum 형식으로 작성된 RoleName도 클래스로 구현하자
`com/example/polls/model/RoleName.java`
|
1
2
3
4
5
6
|
package com.example.polls.model;
public enum RoleName {
ROLE_USER,
ROLE_ADMIN
}
|
cs |
DateAudit 모델
createdAt과 updatedAt 필드를 가지는 모델이다.
model안에 audit 패키지를 만들어서 관리하자 (JPA Auditing를 관련 모델에 모두 적용시키기 위해)
`com/example/polls/model/audit/DateAudit.java`
|
1
2
3
4
5
6
7
8
9
10
11
12
13
14
15
16
17
18
19
20
21
22
23
24
25
26
27
28
29
30
31
32
33
34
35
36
37
38
39
40
41
42
43
44
|
package com.example.polls.model.audit;
import com.fasterxml.jackson.annotation.JsonIgnoreProperties;
import org.springframework.data.annotation.CreatedDate;
import org.springframework.data.annotation.LastModifiedDate;
import org.springframework.data.jpa.domain.support.AuditingEntityListener;
import javax.persistence.Column;
import javax.persistence.EntityListeners;
import javax.persistence.MappedSuperclass;
import java.io.Serializable;
import java.time.Instant;
@MappedSuperclass
@EntityListeners(AuditingEntityListener.class)
@JsonIgnoreProperties(
value = {"createdAt", "updatedAt"},
allowGetters = true
)
public abstract class DateAudit implements Serializable {
@CreatedDate
@Column(nullable = false, updatable = false)
private Instant createdAt;
@LastModifiedDate
@Column(nullable = false)
private Instant updatedAt;
public Instant getCreatedAt() {
return createdAt;
}
public void setCreatedAt(Instant createdAt) {
this.createdAt = createdAt;
}
public Instant getUpdatedAt() {
return updatedAt;
}
public void setUpdatedAt(Instant updatedAt) {
this.updatedAt = updatedAt;
}
}
|
cs |
JPA Auditing 기능을 사용하기 위해선 `@EnableJpaAuditing`를 클래스에 추가하면 된다.
이를 적용할 AuditingConfig 구성 클래스를 작성하여 추가하자
config 패키지를 따로 만들어 관리한다.
`com/example/polls/config/AuditingConfig.java`
|
1
2
3
4
5
6
7
8
9
10
|
package com.example.polls.config;
import org.springframework.context.annotation.Configuration;
import org.springframework.data.jpa.repository.config.EnableJpaAuditing;
@Configuration
@EnableJpaAuditing
public class AuditingConfig {
// That's all here for now. We'll add more auditing configurations later.
}
|
cs |
User 및 Role 모델 데이터를 위한 레포지토리 생성하기
이제 도메인 모델을 모두 정의했기 때문에, 이 모델들을 데이터베이스에 유지하고 검색하기 위한 레포지토리를 만들어야 한다.
우리가 만들 모든 레포지토리는 repository 패키지 안에다가 만들 것이다.
`com/example/polls/repository`
우선, 해당 패키지에서 UserRepository와 RoleRepository 인터페이스를 구현하자
JpaRepository를 상속받아 구현할 것이다.
`com/example/polls/repository/UserRepository.java`
|
1
2
3
4
5
6
7
8
9
10
11
12
13
14
15
16
17
18
19
20
21
22
|
package com.example.polls.repository;
import com.example.polls.model.User;
import org.springframework.data.jpa.repository.JpaRepository;
import org.springframework.stereotype.Repository;
import java.util.List;
import java.util.Optional;
@Repository
public interface UserRepository extends JpaRepository<User, Long> {
Optional<User> findByEmail(String email);
Optional<User> findByUsernameOrEmail(String username, String email);
List<User> findByIdIn(List<Long> userIds);
Optional<User> findByUsername(String username);
Boolean existsByUsername(String username);
Boolean existsByEmail(String email);
}
|
cs |
`com/example/polls/repository/RoleRepository.java`
|
1
2
3
4
5
6
7
8
9
10
11
12
|
package com.example.polls.repository;
import com.example.polls.model.Role;
import com.example.polls.model.RoleName;
import org.springframework.data.jpa.repository.JpaRepository;
import org.springframework.stereotype.Repository;
import java.util.Optional;
@Repository
public interface RoleRepository extends JpaRepository<Role, Long> {
Optional<Role> findByName(RoleName roleName);
}
|
cs |
여기까지 잘 진행한 프로젝트 구조는 아래와 같다.
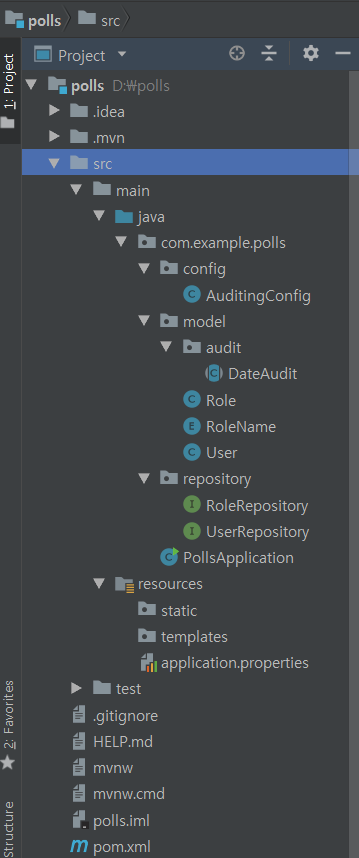
이제 기본적인 틀을 갖췄다.
서버가 잘 돌아가는지 확인해보자. 터미널을 열고 루트 디렉토리에서 아래와 같이 명령어를 입력해보자
mvnw spring-boot:run

빨간색으로 에러가 나오지 않으면 잘 구동되는 것이다!
만약 에러가 나왔다면 메시지를 잘 확인해서 고쳐야한다. 나는 MySQL 데이터베이스의 password를 잘못입력해서 접근이 안됐었다.
서버가 실행되면, MySQL 워크벤치에서 `polling_app` 스키마에 우리가 만든 model들이 테이블로 생성된 모습을 확인할 수 있다. JPA를 쓰면 이렇게 테이블을 자동으로 만들어주는 장점을 느낄 수 있다!
마지막으로, 미리 데이터베이스에서 기본 역할 2가지를 INSERT로 추가해줘야 한다.
INSERT INTO roles(name) VALUES('ROLE_USER');
INSERT INTO roles(name) VALUES('ROLE_ADMIN');

정상적으로 들어간 모습을 확인할 수 있다.
여기까지 기본설정이 끝났다.
다음 포스팅에서는 프로젝트에서 Spring Security를 설정해 새로운 사용자를 등록하고 로그인 기능을 추가해볼 것이다.
'스프링(Spring) > [Spring Boot & React] Polling 웹애플리케이션' 카테고리의 다른 글
| [Spring Boot & React] Polling 웹애플리케이션 만들기 - 2부 (4) | 2019.07.31 |
|---|